前回はとりあえずプロジェクトを作成し、 Caliburn.Micro のお作法に従った Hello,world のようなものをやってみました。
今回はこのプロジェクトを使って、データバインディングを確認をしてみます。
今回も先人の記録を辿りつつ進めていきたいと思います。
- Caliburn Micro Part 2: Data Binding and Events
- 漫坊亭 Caliburn Micro Part 2: Data Binding and Events をやってみる。
ちなみに Caliburn.Micro の Documents の中では Basic Configuration 項にこの部分が書いてありますが、ほんの少しでした。
データバインディング
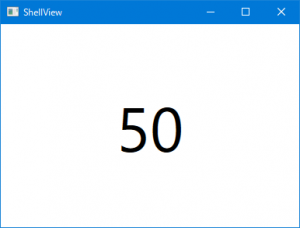
ShellViewModel に Count プロパティを追加します。
public class ShellViewModel : PropertyChangedBase, IShell
{
  private int m_Count = 50;
  public int Count
  {
      get => m_Count;
      set
      {
          m_Count = value;
          NotifyOfPropertyChange(() => Count);
      }
  }
}
ShellView.xaml を以下のように編集してみます。
<Window x:Class="_02_Binding.ShellView"
        xmlns="http://schemas.microsoft.com/winfx/2006/xaml/presentation"
        xmlns:x="http://schemas.microsoft.com/winfx/2006/xaml"
        xmlns:d="http://schemas.microsoft.com/expression/blend/2008"
        xmlns:mc="http://schemas.openxmlformats.org/markup-compatibility/2006"
        xmlns:local="clr-namespace:_02_Binding"
        mc:Ignorable="d"
        Title="ShellView" Height="300" Width="400">
  <Grid>
    <TextBlock Name="Count" FontSize="80"
               VerticalAlignment="Center"
               HorizontalAlignment="Center"/>
  </Grid>
</Window>
これを実行すると以下のようになります。明示的に「Text=”{Binding Count}”」 と書いていないですが、 Caliburn がこのバインド処理を行ってくれます。今回の場合、TextBlock の Name と対応するプロパティを見つけて、バインドを行う処理となっています。
コマンドバインディング
続いて以下のように ShellViewModel クラスにメソッドとプロパティを追加してみます。
public class ShellViewModel : PropertyChangedBase, IShell
{
  private int m_Count = 50;
  public int Count
  {
      get => m_Count;
      set
      {
          m_Count = value;
          NotifyOfPropertyChange(() => Count);
          NotifyOfPropertyChange(() => CanIncrementCount);
      }
  }

  public void IncrementCount()
  {
      Count++;
  }
  public bool CanIncrementCount
  {
      get => m_Count < 80;
  }
}
そして、 ShellView.xaml も以下のように編集します。
<Window x:Class="_02_Binding.ShellView"
        xmlns="http://schemas.microsoft.com/winfx/2006/xaml/presentation"
        xmlns:x="http://schemas.microsoft.com/winfx/2006/xaml"
        xmlns:d="http://schemas.microsoft.com/expression/blend/2008"
        xmlns:mc="http://schemas.openxmlformats.org/markup-compatibility/2006"
        xmlns:local="clr-namespace:_02_Binding"
        mc:Ignorable="d"
        Title="ShellView" Height="300" Width="400">
  <Grid>
    <TextBlock Name="Count"
               FontSize="80"
               VerticalAlignment="Center"
               HorizontalAlignment="Center"/>
    <Button Name="IncrementCount"
            FontSize="20"
            Content="Increment"
            VerticalAlignment="Bottom"
            HorizontalAlignment="Center"
            Margin="20"/>
  </Grid>
</Window>
これを実行して、 Increment ボタンを押すと、カウンタがインクリメントされ、 80 カウントになるとボタンが無効となります。

先ほどと同様にバインディングを記述していませんが、各コントロールの Name プロパティと一致するものを見つけて、バインドする処理が Caliburn によって行われるため不要となっています。Command の Can 系についても、同様に接頭辞 Can が付いたものを見つけて判定処理としてくれています。
余談
もちろん、Name を設定せずに Text=”{Binding Count}” などと記述することも可能です。 ValueConverter が必要なときには、こちらのような書き方をする必要が出てきそうです。