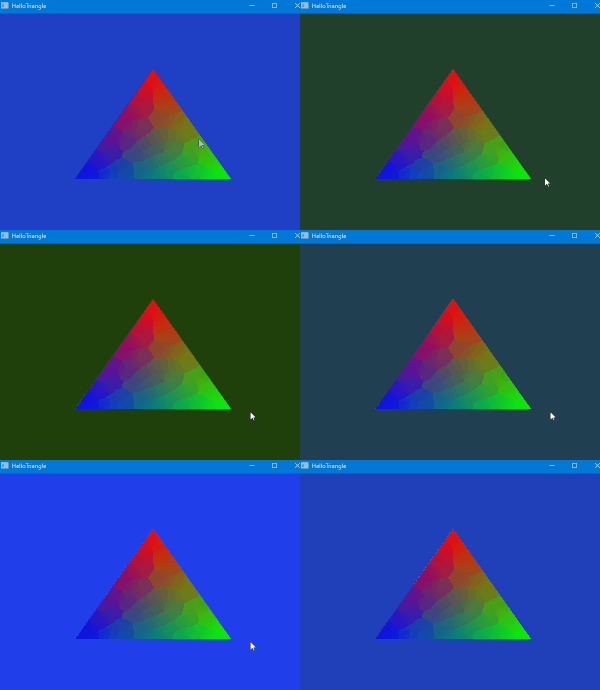
最初の三角形描画
今回は3角形ポリゴンを描画するところを説明していきます。基本となるプログラムは前回の画面クリア処理で実装したものとなります。
差分で説明していきますので、ここから読み始める人はご注意ください。
イベントハンドラの接続
イベントハンドラの接続には以下のようになっています。
public MainWindow()
{
  InitializeComponent();

  vkctrl.EnableValidation = true;

  // 各イベントを繋ぐ.
  vkctrl.VulkanInitialized += Vkctrl_VulkanInitialized;
  vkctrl.VulkanRendering += Vkctrl_VulkanRendering;
  vkctrl.VulkanClosing += Vkctrl_VulkanClosing;
  vkctrl.VulkanResized += Vkctrl_VulkanResized;
  Closing += MainWindow_Closing;
}
実際には初期化関数、リサイズ関数、と順番に呼び出されます。
その後は描画処理が定期的に呼ばれるという構造です。
初期化関数
初期化の関数の中は以下のようになっています。
private void Vkctrl_VulkanInitialized(object sender, SharpVulkanWpf.VulkanEventArgs args)
{
  var device = args.Device;
  var commandPoolCreateInfo = new VkCommandPoolCreateInfo()
  {
      queueFamilyIndex = args.GraphicsQueueIndex,
      flags = VkCommandPoolCreateFlags.VK_COMMAND_POOL_CREATE_RESET_COMMAND_BUFFER_BIT,
  };
  VulkanAPI.vkCreateCommandPool(device, ref commandPoolCreateInfo, out m_commandPool);

  var allocateInfo = new VkCommandBufferAllocateInfo()
  {
      commandBufferCount = 1,
      commandPool = m_commandPool,
  };
  VulkanAPI.vkAllocateCommandBuffers(device, ref allocateInfo, out m_commandBuffers);

  // 頂点入力情報の構築.
  m_vertexInputState = CreateVertexInputState();
  // プリミティブの情報 トライアングルリストでデータが生成されている.
  m_inputAssemblyState = new VkPipelineInputAssemblyStateCreateInfo()
  {
      topology = VkPrimitiveTopology.VK_PRIMITIVE_TOPOLOGY_TRIANGLE_LIST
  };
  // シェーダーステージ情報の構築.
  m_shaderStages = new VkPipelineShaderStageCreateInfo[2]
  {
      SampleHelpers.CreateShader( device, "resource/simpleVS.spv", VkShaderStageFlagBits.VK_SHADER_STAGE_VERTEX_BIT ),
      SampleHelpers.CreateShader( device, "resource/simpleFS.spv", VkShaderStageFlagBits.VK_SHADER_STAGE_FRAGMENT_BIT ),
  };
  // ラスタライザーステートの構築.
  m_rasterizationState = new VkPipelineRasterizationStateCreateInfo();
  // デプスステンシルステートの構築.
  m_depthStencilState = new VkPipelineDepthStencilStateCreateInfo();
  // カラーブレンドステートの構築.
  m_colorBlendState = new VkPipelineColorBlendStateCreateInfo();
  var colorBlendAttachment = new VkPipelineColorBlendAttachmentState();
  m_colorBlendState.attachments = new[] { colorBlendAttachment };

  // マルチサンプルステートの構築.
  m_multisampleState = new VkPipelineMultisampleStateCreateInfo();

  // パイプラインレイアウトの構築.
  m_pipelineLayout = CreatePipelineLayout(device);

  // ビューポートステートの構築.
  m_viewportState = CreateViewportState();

  // グラフィックスパイプラインを構築.
  m_graphicsPipeline = CreateGraphicsPipeline(device, vkctrl.GetControlRenderPass());

  // 頂点バッファの作成.
  CreateVertexBuffer(device, args.PhysicalDevice);
}
見てわかるように、ステート情報の構築が比較的多めになっています。
SharpVulkan では一応初期値でそれなりに動くように値が入っていますが、それでも個々に設定が必要な部分があります。
そういった部分は各種メンバ関数に追い出しています。
頂点情報の設定
頂点バッファがどのような情報で構成されているのかを設定するのが VkPipelineVertexInputState です。
従来で言うところの頂点フォーマット関連のオブジェクトに相当します。
これを作成するメンバ関数は以下のように実装します。
private VkPipelineVertexInputStateCreateInfo CreateVertexInputState()
{
  var attribPosition = new VkVertexInputAttributeDescription()
  {
      location = 0,
      binding = 0,
      offset = 0,
      format = VkFormat.VK_FORMAT_R32G32B32_SFLOAT,
  };
  var attribColor = new VkVertexInputAttributeDescription()
  {
      location = 1,
      binding = 0,
      offset = 12,
      format = VkFormat.VK_FORMAT_R32G32B32A32_SFLOAT,
  };
  var vertexInputBindingDesc = new VkVertexInputBindingDescription()
  {
      binding = 0,
      inputRate = VkVertexInputRate.VK_VERTEX_INPUT_RATE_VERTEX,
      stride = (uint)Marshal.SizeOf(),
  };
  var vertexInputState = new VkPipelineVertexInputStateCreateInfo()
  {
      attributeDescriptions = new[] { attribPosition, attribColor },
      bindingDescriptions = new[] { vertexInputBindingDesc },
  };
  return vertexInputState;
}
頂点バッファの作成
頂点データは CreateVertexBuffer で作成しています。
この関数は以下のようになっています。初期頂点データは、確保したメモリに対してマップを実行してデータを書き込むという方法で設定します。
private void CreateVertexBuffer( VkDevice device, VkPhysicalDevice physicalDevice )
{
  // 初期頂点データ.
  var vertices = new Vertex[3] {
      new Vertex() { Position = new vec3(-.5f,0.5f,0.0f), Color= new vec4(0.0f, 0.0f, 1.0f, 1.0f) },
      new Vertex() { Position = new vec3(+.5f,0.5f,0.0f), Color= new vec4(0.0f, 1.0f, 0.0f, 1.0f) },
      new Vertex() { Position = new vec3(0.0f,-.5f,0.0f), Color= new vec4(1.0f, 0.0f, 0.0f, 1.0f) },
  };
  var bufferSize = Marshal.SizeOf() * vertices.Length;
  VkMemoryPropertyFlags memoryFlags = VkMemoryPropertyFlags.VK_MEMORY_PROPERTY_HOST_VISIBLE_BIT | VkMemoryPropertyFlags.VK_MEMORY_PROPERTY_HOST_COHERENT_BIT;
  SampleHelpers.CreateBuffer(device, physicalDevice, bufferSize, VkBufferUsageFlags.VK_BUFFER_USAGE_VERTEX_BUFFER_BIT, memoryFlags, out m_vertexBuffer, out m_vertexBufferMemory);

  // 初期頂点データの書き込み.
  MappedMemoryStream mappedStream;
  VulkanAPI.vkMapMemory(device, m_vertexBufferMemory, 0, VkDeviceSize.VK_WHOLE_SIZE, 0, out mappedStream);
  mappedStream.Write(vertices);
  VulkanAPI.vkUnmapMemory(device, m_vertexBufferMemory);
}
ここで使用しているヘルパ関数 SampleHelpers.CreateBuffer は以下のようになっています。
public static void CreateBuffer(VkDevice device, VkPhysicalDevice physicalDevice, int bufferSize, VkBufferUsageFlags usageFlags, VkMemoryPropertyFlags memoryFlags, out VkBuffer buffer, out VkDeviceMemory memory)
{
  var bufferCreateInfo = new VkBufferCreateInfo(usageFlags, bufferSize);
  VulkanAPI.vkCreateBuffer(device, ref bufferCreateInfo, out buffer);
  VkMemoryRequirements requirements;
  VulkanAPI.vkGetBufferMemoryRequirements(device, buffer, out requirements);
  VulkanAPI.vkAllocateMemory(device, physicalDevice, ref requirements, memoryFlags, out memory);
  VulkanAPI.vkBindBufferMemory(device, buffer, memory, 0);
}
シェーダーについて
上記でシェーダーを設定している部分が既に登場していました。
これは glsl で書かれたシェーダーを glslangValidator を使って SPV 形式に変換済みのファイルを指定しています。
以下のように実行して作成していますが、 glslangValidator は Vulkan SDK のインストールが必要だと思います。
glslangValidator -V shader.vert -o simpleVS.spv
リサイズ関数
初期化関数で準備したリソースは基本的にウィンドウ解像度に依存しないものばかりでした。
ここのリサイズ関数の中では解像度に関係するものを初期化します。
private void Vkctrl_VulkanResized(SharpVulkanWpf.VulkanSizeChangedEventArgs e)
{
  var device = e.Device;
  m_viewportState = CreateViewportState();
  if (m_graphicsPipeline != null)
      VulkanAPI.vkDestroyPipeline(device, m_graphicsPipeline);
  var renderPass = vkctrl.GetControlRenderPass();
  m_graphicsPipeline = CreateGraphicsPipeline(device, renderPass);
}
ビューポートの設定と、コントロールが保持している RenderPass の情報から、今回使用するための GraphicsPipeline を生成します。
この生成関数は以下のようになっています。
private VkPipeline CreateGraphicsPipeline(VkDevice device, VkRenderPass renderPass)
{
  VkPipeline pipeline = null;
  var createInfo = new VkGraphicsPipelineCreateInfo()
  {
      inputAssemblyState = m_inputAssemblyState,
      vertexInputState = m_vertexInputState,
      pRasterizationState = m_rasterizationState,
      pDepthStencilState = m_depthStencilState,
      pColorBlendState = m_colorBlendState,
      pMultisampleState = m_multisampleState,
      pStages = m_shaderStages,
      viewportState = m_viewportState,
      layout = m_pipelineLayout,
      renderPass = renderPass
  };
  VulkanAPI.vkCreateGraphicsPipelines(device, null, 1, ref createInfo, out pipeline);
  return pipeline;
}
このオブジェクトを生成するのにたくさんのステートが必要になっているのがわかるかと思います。
描画処理
今までに情報は構築したので、描画について説明していきます。
描画関数の中身は以下のようになっています。初期化に比べるとコード量は減っています。
vkCmdBeginRenderPass でレンダーパスを開始して、その中でグラフィックスパイプラインのバインドや、バッファのセットを行い、ポリゴンを描画するコマンドを積むだけです。
private void Vkctrl_VulkanRendering(object sender, SharpVulkanWpf.VulkanEventArgs args)
{
  var device = args.Device;
  var image = vkctrl.AcquireNextImage();
  var framebuffer = vkctrl.AcquireNextFramebuffer();

  var command = m_commandBuffers[0];
  VulkanAPI.vkBeginCommandBuffer(command);

  VkClearColorValue clearColor = new VkClearColorValue();
  clearColor.valF32.R = 0.125f;
  clearColor.valF32.G = 0.25f;
  clearColor.valF32.B = (float)(0.5f * Math.Sin(m_frameCount * 0.1) + 0.5);
  clearColor.valF32.A = 1.0f;

  var renderArea = new VkRect2D()
  {
      offset = new VkOffset2D(),
      extent = vkctrl.GetCurrentExtent(),
  };

  var renderPassBeginInfo = new VkRenderPassBeginInfo()
  {
      framebuffer = framebuffer,
      renderArea = renderArea,
      renderPass = vkctrl.GetControlRenderPass(),
      pClearValues = new[] { new VkClearValue() { color = clearColor } }
  };

  VulkanAPI.vkCmdBeginRenderPass(command, ref renderPassBeginInfo, VkSubpassContents.VK_SUBPASS_CONTENTS_INLINE);

  VulkanAPI.vkCmdBindPipeline(command, VkPipelineBindPoint.VK_PIPELINE_BIND_POINT_GRAPHICS, m_graphicsPipeline);
  VulkanAPI.vkCmdBindVertexBuffers(command, 0, 1, new[] { m_vertexBuffer }, new[] { (VkDeviceSize)0 });
  VulkanAPI.vkCmdDraw(command, 3, 1, 0, 0);

  VulkanAPI.vkCmdEndRenderPass( command );
  VulkanAPI.vkEndCommandBuffer(command);

  var submitInfo = new VkSubmitInfo()
  {
      commandBuffers = new[] { command }
  };
  VulkanAPI.vkQueueSubmit(args.GraphicsQueue, new VkSubmitInfo[] { submitInfo }, null);

  vkctrl.SwapBuffers();
  m_frameCount++;
}
後始末
今回色々と作成したデータは終了前に破棄する必要があります。これらのコードは以下のようになっています。
private void Vkctrl_VulkanClosing(object sender, SharpVulkanWpf.VulkanEventArgs args)
{
  // 本クラスで作ったVulkanの各リソースを破棄する.
  var dev = args.Device;
  VulkanAPI.vkDestroyPipeline(dev, m_graphicsPipeline); m_graphicsPipeline = null;
  VulkanAPI.vkDestroyPipelineLayout(dev, m_pipelineLayout); m_pipelineLayout = null;

  m_shaderStages.Select(x => x.module).ToList().ForEach(x => VulkanAPI.vkDestroyShaderModule(dev, x));

  VulkanAPI.vkDestroyBuffer(dev, m_vertexBuffer); m_vertexBuffer = null;
  VulkanAPI.vkFreeMemory(dev, m_vertexBufferMemory); m_vertexBufferMemory = null;

  VulkanAPI.vkFreeCommandBuffers(dev, m_commandPool, m_commandBuffers);
  VulkanAPI.vkDestroyCommandPool(dev, m_commandPool);
  m_commandBuffers = null;
  m_commandPool = null;
}

まとめ
今回のコードは GitHub のほうにサンプルプロジェクトとして公開中です。
リポジトリはこちらになります。 https://github.com/techlabxe/VulkanSharpTutorial